Good morning, stamping friends and a belated Happy Mother’s Day to you! I hope you all had a lovely day and a wonderful weekend too. It’s my turn to share a Pick of the Week so I decided to comb through my archives and share something with you that I used to teach long ago… a fun explosion box!
So here I’ll show you how to transform a few sheets of card stock into a special keepsake album in a box. The “explosion” happens when you remove the lid of the box. The sides of the box collapse outward exposing layers of mini album pages. Stamp, embellish and add your own photos to create your one-of-a-kind keepsake box. You will have space for up to 20 photos and/or journaling. This kit makes a 4″ x 4″ square box with a cover… large enough to also tuck a small lightweight gift inside if you choose.
Supplies:
4 sheets of heavy card stock (I used something similar to a bazzill linen)… one 12″ x 12″ for the bottom layer (box), one 11 1/4″ x 11 1/4″ for the 2nd layer, one 10 1/2″ x 10 1/2″ for the 3rd layer, and one 8″ x 8″ for the box top
Ruler
Pencil
Scoring Tool
Cutting Tool
Adhesive (I would recommend double-sided tape or glue dots to assemble the box and attached photos and any embellishments. And glue dots or a wet glue for constructing the box top.)
4 paperclips (to hold box top in place while drying)
Corner rounder punch - optional
Ribbon - optional
Repeat Impressions’ stamps:
5812-I, Compass
5806-H, Happiness
6510-D, Forever Friends
6514-C, Heart & Soul
6522-C, Sweet Dreams
6513-E, Magic & Miracles
along with many other sentiments from our Legacy Text Series that can’t be seen in the photo.
Instructions:
1. If desired, start by stamping on one side of both the 12″ x 12″ and the 8″ x 8″ squares. These two pieces will make up the outside of your box and the box top. Then set aside the largest square to use in assembling your box later.
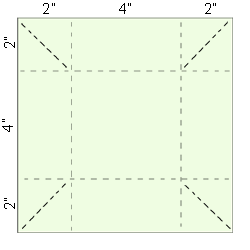
2. Using the 8″ x 8″ square to make the box top, start by turning the card stock over to the blank side. This square will first be scored 1 1/2 inches in from all four sides. Then score from the tip of each corner, diagonally in, until you meet the scored “corner” lines you created previously as shown here…
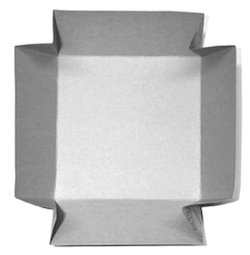
3. Fold up all your score lines, pinching in the corners and folding them inwards as shown in this photo…
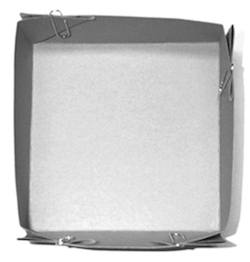
4. Glue down the folded corners to the inside edges using a wet glue or glue dots (regular double-sided tape is NOT strong enough to hold this permanently). Use paperclips to hold the corners in place while drying. Once your box top is dry, remove the paperclips and embellish the box top if you wish.
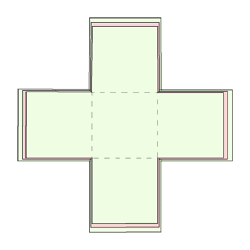
5. Now it is time to start making the box itself. Score the remaining 3 squares as follows. Each square will be scored on all four sides creating a tic-tac-toe board like pattern.
• score the 12″ x12″ sheet, 4 inches in from each side (turn it over and score on the blank side)
• score the 11 1/4″ x 11 1/4″ sheet, 3 3/4 inches in from each side
• score the 10 1/2″ x 10 1/”2 sheet, 3 1/2 inches in from each side

6. Following your scored lines, cut off all four corner squares on all three pieces. (Optional - now use your punch to round all your corners if you wish.)
Tip: You may want to recycle some of the corner squares you cut away and use them as layering pieces on various panels of your box or as I did on my box top.
7. Fold up the edges on your scored lines. These 3 pieces will be nested to create the pages of your album.
8. Now comes the fun part… personalizing the inside pages of your box! Stamp and embellish each of the four side panels on all three sheets as you wish. You have pages for up to 20 photos and/or journaling inside.
9. If you would like the inside, bottom of your box to be decorative then you will want to embellish the center square of smallest nested piece ONLY and on one side only (the face-up side).
10. To assemble the box it is easiest if you start by putting the medium piece onto the largest piece and then attach the smallest one to those. I recommend double-sided tape or glue dots for this. You ONLY put adhesive on the back of the center squares of the medium and small pieces. Once you have them put together you should end up with something that looks like this…
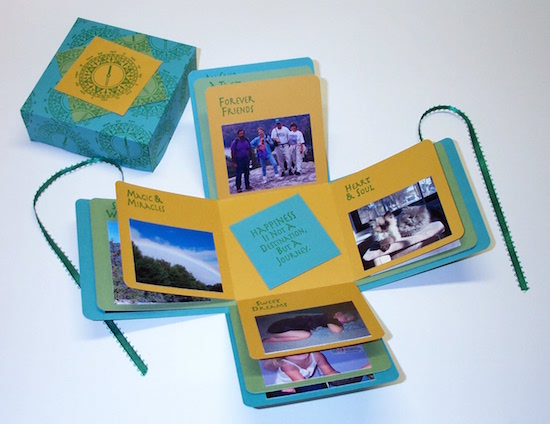
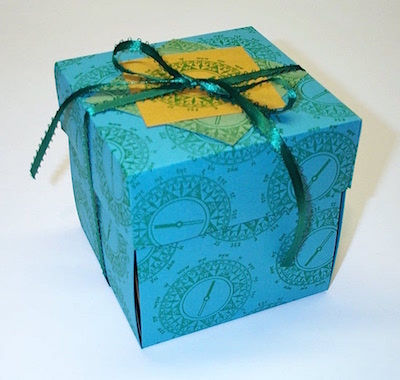
11. Carefully fold up the pages to form the box shape, then place the cover on top to hold the box together. (Optional - tie a ribbon around the completed box and and make a bow on top.)
I hope you enjoyed my tutorial and will give Keepsake Explosion Boxes a try. Now that you’ve seen how easy it is to make one of these fun boxes you’ll want to be creating them for all kinds of special occasions!
~ Wendy
For this week only (May 14-20, 2018), get 20% Off the stamps shown in Wendy’s box above including the rest of the sentiments in our Legacy Text Series when you use the coupon code POTW51418
4 Responses to “Pick of the Week ~ Keepsake Explosion Box”
Sorry, the comment form is closed at this time.
What an awesome explosion box and a super easy to follow tutorial too! Love this Wendy!
Wow, this is stunning!
My niece made one of these for her mom (my sister). She did a great job.
And yours is lovely as well. I will have to try one, too.
Awesome!! I’ve seen these around and they look fabulous. Just haven’t gotten brave enough to give one a try. Awesome tutorial!